The input for the program in this tutorial is a text file with these contents:
// Each line contains:
//   slide title, country name, city name, image path
Rathaus,Germany,Hamburg,images/rathaus.jpg
Namdaemun (남대문),South Korea,Seoul (서을),images/namdaemun.jpg
Louvre Museum,France,Paris,images/louvre.jpg
Opera House,Norway,Oslo,images/oslo_opera_house.jpg
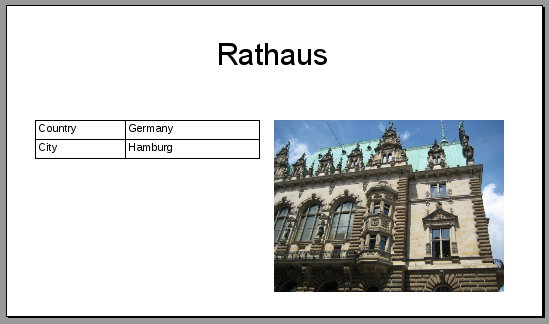
The program’s output will be an OpenDocument presentation file. Here is a slightly edited screenshot of what the first slide will look like.
The area at the left that looks like a table is not an
OdfTable like the one
in the previous tutorial. Instead,
it is a set of four rectangles that have text labels.
The program is written to be run from the command line program; you invoke it with a command like this:
java -cp lib/odfdom-java-0.12.0-jar-with-dependencies.jar:. \
   TravelPresentation slideinfo.txt
In order for the following code to make sense, you need to know how a
presentation document is represented in OpenDocument.
An ODF presentation’s
content.xml file
contains an <office:presentation> element.
Each of its <draw:page> children represents one slide.
within the document.
Geometric shapes such as rectangles and circles are drawn directly on to the page. Text and images
are placed inside a “frame” that contains the position and dimensions of
that particular object; in ODFDOM, these are represented by the OdfDrawFrame class.
The name of the input file and output file will come straight from args[0] and args[1]
rather than be stored in a separate variable.
As in the previous tutorials, we do need variables for the presentation document and its “access points.”
class TravelPresentation {
    OdfPresentationDocument outputDocument;
    OfficePresentationElement officePresentation;
    OdfContentDom contentDom;
    OdfOfficeAutomaticStyles contentAutoStyles;
The presentation needs to create automatic styles in the content.xml only, so we will dispense with variables for accessing the styles.xml named and automatic styles.
Once again, because the ODFDOM toolkit automatically generates unique style names for you, the program must keep track of their names in order to apply those styles to elements.
String slideTitleStyleName;
String imageStyleName;
String fauxTableRectangleStyleName;
String fauxTableTextStyleName;
These styles are used for the slide title, the image, the rectangles that make up the simulated (faux) table and the text inside those rectangles.
This having been done, here is the main() method,
which creates an application and runs it via the run()
method. Notice the call to deleteSlideByIndex(0): when the toolkit creates a presentation document, it has a blank slide at the beginning. We don’t want it, so we’ll delete it right away.
    public static void main(String[] args) {

        TravelPresentation app = new TravelPresentation();
        if (args.length == 2) {
            app.run(args);
        } else {
            System.err.println("Usage: TravelPresentation infile outfile");
        }
    }


    void run(String[] args) {
        setupOutputDocument();
        outputDocument.deleteSlideByIndex(0);
        addAutomaticStyles();
        createPages(args[0]);
        saveOutputDocument(args[1]);
    }
Here’s the code that sets up the output documnet and retrieves the main office:presentation element, content DOM, and the automatic styles in the content.
   private void setupOutputDocument() {
        try {
            outputDocument =
                OdfPresentationDocument.newPresentationDocument();
            officePresentation = outputDocument.getContentRoot();

            contentDom = outputDocument.getContentDom();
            contentAutoStyles = contentDom.getOrCreateAutomaticStyles();
        }
        catch (Exception e) {
            System.err.println("Unable to create output file.");
            System.err.println(e.getMessage());
            outputDocument = null;
        }
    }
This function parses the input file. It does not use any calls
to ODFDOM, but it is given here for the sake of completeness. If
the parsing goes well, the slideList is filled;
otherwise it is set to null.
private void processInput(String inputFileName) {
    BufferedReader dataFile;
    String data;
    try {
        dataFile = new BufferedReader(new FileReader(inputFileName));
        data = dataFile.readLine();
        while (data != null) {
            if (!(data.startsWith("//") || data.matches("^\\s*$"))) {
                slideList.add(new SlideInfo(data.split("\\s*,\\s*")));
            }
            data = dataFile.readLine();
        }
        dataFile.close();
    } catch (FileNotFoundException e) {
        System.err.println("Unable to open file" + inputFileName);
        slideList = null;
    } catch (IOException e) {
        System.err.println("Error reading file " + inputFileName);
        slideList = null;
    }
}
The setupOutputDocument() method starts by calling
newPresentationDocument() to create an ODF presentation
document from a template that is built into the library. Once you
have the document, the method gets the the Document Object Model (a
subclass of Document) for the content.xml and
the <office:presentation> element that is the content
root. All of the data that make up the
document’s content will be children of this element.
void setupOutputDocument() {
    try {
        outputDocument =
            OdfSpreadsheetDocument.newSpreadsheetDocument();
        contentDom = outputDocument.getContentDom();
        contentAutoStyles = contentDom.getOrCreateAutomaticStyles();
        officePresentation = outputDocument.getContentRoot();
    } catch (Exception e) {
        System.err.println("Unable to create output file.");
        System.err.println(e.getMessage());
        outputDocument = null;
    }
}
Here is the code for adding the four styles that this
program needs. The OdfStyleGraphicProperties.Clip
property is a rectangle that tells how much of the image to clip.
The values are for the top, right, bottom, and left side of the
image (clockwise from 12:00). In this case, you want the entire
picture, so all four values are set to zero.
void addAutomaticStyles() {
    OdfStyle style;

    /* The style for the slide title */
    style = contentAutoStyles.newStyle(OdfStyleFamily.Presentation);
    slideTitleStyleName = style.getStyleNameAttribute();
    style.setProperty(OdfStyleGraphicProperties.AutoGrowHeight, "true");
    style.setProperty(OdfStyleGraphicProperties.MinHeight, "3cm");
    style.setProperty(OdfStyleTextProperties.FontFamily, "Helvetica");
    style.setProperty(OdfStyleTextProperties.FontSize, "44pt");

    /* Style for the image element */
    style = contentAutoStyles.newStyle(OdfStyleFamily.Graphic);
    imageStyleName = style.getStyleNameAttribute();
    style.setProperty(OdfStyleGraphicProperties.MinHeight, "10cm");
    style.setProperty(OdfStyleGraphicProperties.Clip,
        "rect(0cm, 0cm, 0cm, 0cm)");

    /* Graphic style for the table rectangles */
    style = contentAutoStyles.newStyle(OdfStyleFamily.Graphic);
    fauxTableRectangleStyleName = style.getStyleNameAttribute();
    style.setProperty(OdfStyleGraphicProperties.FillColor,
        "#ffffff");
    style.setProperty(OdfStyleGraphicProperties.TextareaVerticalAlign,
        "middle");
    style.setProperty(OdfStyleGraphicProperties.PaddingLeft, "8pt");

    /* Style for the text in the table */
    style = contentAutoStyles.newStyle(OdfStyleFamily.Paragraph);
    fauxTableTextStyleName = style.getStyleNameAttribute();
    style.setProperty(OdfStyleTextProperties.FontFamily, "Helvetica");
    style.setProperty(OdfStyleTextProperties.FontSize, "16pt");
}
The beginning of the createPages() method opens a Scanner to read the
input file. If it can do so successfully, it sets a counter variable lets you give
consecutive style names to each of the slides. If a line starts with // it’s a
comment. Otherwise, we split the line on commas. If Thee
   void createPages(String inputFileName) {

        try (Scanner slideInfoScanner = new Scanner(new File(inputFileName))) {
            int counter = 1;
            while (slideInfoScanner.hasNextLine()) {
                String info = slideInfoScanner.nextLine();
                if (!info.startsWith("//")) {
                    String[] parts = info.split(",");
                    if (parts.length == 4) {
                        createOnePage(parts, counter);
                    } else {
                        System.err.println("\"" + info + "\" does not have the correct number of items.");
                    }
                    counter++;
                }
            }
        } catch (Exception e) {
                // do nothing; no pictures will be added.
        }
    }
Here is the code for creating one page, given the slide information and a counter.
The newDrawPageElement requires the name of a “master page,”
but you may safely leave this as the empty string or null. The setDrawNameAttribute
sets an attribute used for referencing graphic elements.
    void createOnePage(String[] info, int counter) {

        DrawPageElement page = officePresentation.newDrawPageElement(null);
        page.setDrawNameAttribute("pg" + Integer.toString(counter));
Since the title is text rather than a graphic primitive such as a line, it
must be placed inside a DrawFrameElement.
The title’s position and dimensions are set in the frame as the
the x, y, width and
height. In the XML, these attributes are borrowed from
the SVG (Scalable Vector Graphics) namespace, hence the Svg
prefix.
    /* Create the title in a <draw:frame> element */
    DrawFrameElement frame = page.newDrawFrameElement();
    frame.setPresentationStyleNameAttribute(slideTitleStyleName);
    frame.setPresentationClassAttribute(
        PresentationClassAttribute.Value.TITLE.toString());
    frame.setSvgXAttribute("1.4cm");
    frame.setSvgYAttribute("0.85cm");
    frame.setSvgWidthAttribute("25cm");
    frame.setSvgHeightAttribute("3.5cm");
Inside the frame is a <draw:text-box> element containing a <text:p>.
    DrawTextBoxElement textBox = frame.newDrawTextBoxElement();
    TextPElement para = textBox.newTextPElement();
    para.setTextContent(info[0]);
Next, the page needs the image. It also is inside a frame, whose dimensions we specify. This is in a
try/catch block.
        frame = page.newDrawFrameElement();
        frame.setPresentationStyleNameAttribute(imageStyleName);
        frame.setPresentationClassAttribute(
            PresentationClassAttribute.Value.GRAPHIC.toString());
        frame.setSvgXAttribute("14cm");
        frame.setSvgYAttribute("6cm");
We now create an OdfDrawImage. The newImage() method inserts the image into the
document’s Pictures directory. It returns the internal document path name.
We then use setXlinkHrefAttribute() to connect the draw:image element to
that path name, and add the image to the frame with appendChild().
        OdfDrawImage image = new OdfDrawImage(contentDom);
        String imgPath = image.newImage(new URI(info[3]));
        image.setXlinkHrefAttribute(imgPath);
        frame.appendChild(image);
Because we want all the images to have the same width (12cm),
we must read the image again with ImageIO.read to
get its dimensions and calculate the correct height for the image.
    BufferedImage buffer = ImageIO.read(new File(info[3]));
    frame.setSvgWidthAttribute("12cm");
    frame.setSvgHeightAttribute(Double.toString(
        (12.0 * buffer.getHeight()) / buffer.getWidth())
            + "cm");
Finally, each page has to have the rectangles with the country and city names. This task is delegated to a separate method:
    page.appendChild(createDrawnTable(info));
    }
}
The code to create the “table” creates an
<draw:g> group of the four rectangles and
returns that group to be inserted into the page. If you open the
resulting file in LibreOffice and click the table, you will be
able to ungroup it into its component rectangles.
The createDrawnTable() in turn calls the helper
method createTextRectangle(), whose parameters are as
described in the javadoc.
private OdfDrawGroup createDrawnTable(SlideInfo info) {
    OdfDrawGroup group = new OdfDrawGroup(contentDom);

    group.appendChild(createTextRectangle(
        "Country", "1.5cm", "6cm", "4.7cm", "1cm"));
    group.appendChild(createTextRectangle(
        info.getCountry(), "6.2cm", "6cm", "7cm", "1cm"));
    group.appendChild(createTextRectangle(
        "City", "1.5cm", "7cm", "4.7cm", "1cm"));
    group.appendChild(createTextRectangle(
        info.getCity(), "6.2cm", "7cm", "7cm", "1cm"));
    return group;
}

/*
 * Create a rectangle that contains text.
 * @param textValue the text to display inside the rectangle
 * @param x coordinate of left corner of rectangle
 * @param y coordinate of upper corner of rectangle
 * @param width width of rectangle
 * @param height height of rectangle
 */
private DrawRectElement createTextRectangle(String textValue, String x, String y,
    String width, String height) {
    DrawRectElement r = new DrawRectElement(contentDom);
    OdfTextParagraph p;

    r.setSvgXAttribute(x);
    r.setSvgYAttribute(y);
    r.setSvgWidthAttribute(width);
    r.setSvgHeightAttribute(height);
    r.setDrawStyleNameAttribute(fauxTableRectangleStyleName);

    p = new OdfTextParagraph(contentDom);
    p.setStyleName(fauxTableTextStyleName);
    p.appendChild(contentDom.createTextNode(textValue));
    r.appendChild(p);
    return r;
}
This consists of only one line of actual code, surrounded by error handling.
void saveOutputDocument()
{
    try
    {
        outputDocument.save(outputFileName);
    }
    catch (Exception e)
    {
        System.err.println("Unable to save document.");
        System.err.println(e.getMessage());
    }
}
You may download the files for this program.