This tutorial works for ODFDOM version 0.12.0.
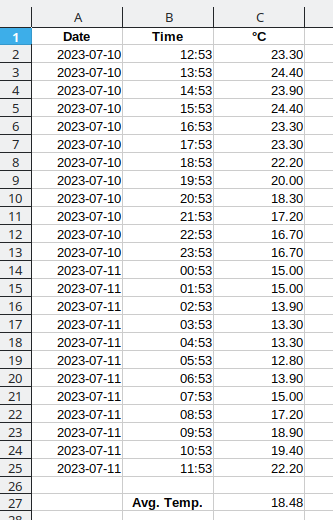
The input for the program in this tutorial is a text file that contains weather observations for a 24-hour period. Each line contains an observation date, time of day, and temperature in degrees Celsius. The program’s output will be an OpenDocument spreadsheet file. Here is a partial screenshot of what the result will look like.
The program is written to be run from the command line program; you invoke it with a command like this:
java -cp lib/odfdom-java-0.12.0-jar-with-dependencies.jar:. \
   WeatherSpreadsheet weatherdata.txt weatherdata.ods
In order for the following code to make sense, you need to know how a
spreadsheet document is represented in OpenDocument.
An ODF spreadsheet’s
content.xml file
contains an <office:spreadsheet> element.
Each of its <table:table> children represents one worksheet
within the document. Tables and their styles are built in this hierarchy:
<table:table> may have a style that describes its
borders and page-break properties (this is because tables can appear in
text documents as well as spreadsheets).
<table:table-column> elements
specifies the width of each of the table columns
and the default style for cells
in that column.
<table:table-row> elements that specify
the height of each row.
<table:table-cell>
elements. A cell has attributes that specify:
<text:p> child that gives
the presentation form of the cell’s value. If none is given,
some applications such as LibreOffice will evaluate the
cell value and display it.
The program starts out by declaring variables that you need to accomplish the task. First, you need a variable to hold the name of the input file and output file, and the spreadsheet document.
String inputFileName;
String outputFileName;

OdfSpreadsheetDocument outputDocument;
As described in the previous tutorial, you also need variables for the main “access points” to the document:
OdfContentDom contentDom;	// the document object model for content.xm
OdfStylesDom stylesDom;	// the document object model for styles.xml


// the office:automatic-styles element in content.xml
OdfOfficeAutomaticStyles automaticStyles;

// the office:styles element in styles.xml
OdfOfficeStyles officeStyles;
Unlike the previous tutorial, this spreadsheet does not create any
named styles, so it does not need the stylesOfficeStyles
variable; it is just here for the sake of completeness.
In this program, you will be creating automatic styles. The end user of the document does not need to see the names of these styles, and the ODFDOM toolkit automatically generates unique style names for you. In order for the program to apply those styles to elements, though, it must keep track of their names:
OdfStyle rowStyle;
OdfStyle columnStyle;
OdfStyle headingStyle;
OdfStyle weatherDateStyle;
OdfStyle weatherTimeStyle;
OdfStyle weatherTemperatureStyle;
These styles correspond to the styles mentioned in the table hierarchy. The last three styles are prefixed
with weather to help distinguish
the names from ODF’s date and time format styles, which you will see in
a while.
As mentioned previously, the content.xml file for a spreadsheet document has
all the tables as a child of an
<office:spreadsheet> element. That element wil be stored in:
OdfTable spreadsheetTable;
This having been done, here is the main() method,
which creates an application and runs it via the run()
method:
public static void main(String[] args) {
    WeatherSpreadsheet app = new WeatherSpreadsheet();
    app.run(args);
}

public void run(String[] args) {
    if (args.length == 2) {
        inputFileName = args[0];
        outputFileName = args[1];

        setupOutputDocument();

        if (outputDocument != null) {
            addAutomaticStyles();
            processInputDocument();
            saveOutputDocument();
        }
    } else {
        System.err.println("Usage: WeatherSpreadsheet infile outfile");
    }
}
The setupOutputDocument() method starts by calling
newSpreadsheetDocument() to create an ODF text
document from a template that is built into the library. Once you
have the document, the method gets the the Document Object Model (a
subclass of Document) for the content.xml and
styles.xml file.
setupOutputDocument() then retrieves the
automatic styles in content.xml and the named styles in
styles.xml (or creates them if they don’t exist yet).
void setupOutputDocument() {
    try {
        outputDocument =
            OdfSpreadsheetDocument.newSpreadsheetDocument();
        contentDom = outputDocument.getContentDom();
        stylesDom = outputDocument.getStylesDom();
        contentAutoStyles = contentDom.getOrCreateAutomaticStyles();
        stylesOfficeStyles = outputDocument.getOrCreateDocumentStyles();
    } catch (Exception e) {
        System.err.println("Unable to create output file.");
        System.err.println(e.getMessage());
        outputDocument = null;
    }
}
Before continuing with the part of the program that creates the styles, you need to know a bit about how styles and tables interact. In the previous tutorial, you created a style by doing these steps:
For automatic styles, the sequence is similar:
This sequence works for setting up styles for table columns, table rows, and table cells that don’t require any formatting of their data. For cells that need data formatting, you have a few additional steps:
Let’s see this process in action. The
addAutomaticStyles() method starts by setting up
styles for
table columns (2.5cm wide), rows (0.5cm tall), and header
cells (bold and centered).
void addAutomaticStyles() {
    // bold centered cells (for first row)
    headingStyle = automaticStyles.newStyle(OdfStyleFamily.TableCell);
    headingStyle.setProperty(StyleParagraphPropertiesElement.TextAlign, "center");
    setFontWeight(headingStyle, "bold");
The last line in the method calls the setFontWeight()
method. This utility code,
described in
the previous tutorial, sets the font weight for western, asian,
and complex scripts.
Now the method creates the data formatting styles and appends them to the
automatic styles.
The format strings for date and time are
the same as those used in Java’s SimpleDateFormat class,
and the format strings for numbers are the same as those used in
Java’s DecimalFormat class.
    // Create the date, time, and temperature styles and add them.
    // The null in OdfNumberDateStyle means "use default calendar system"
    OdfNumberDateStyle dateStyle = new OdfNumberDateStyle(contentDom,
        "yyyy-MM-dd", "weatherDateStyle", null);
    OdfNumberTimeStyle timeStyle = new OdfNumberTimeStyle(contentDom,
        "hh:mm", "weatherTimeStyle");
    OdfNumberStyle numberStyle = new OdfNumberStyle(contentDom,
        "#0.00", "weatherTemperatureStyle");

    contentAutoStyles.appendChild(dateStyle);
    contentAutoStyles.appendChild(timeStyle);
    contentAutoStyles.appendChild(numberStyle);
The method concludes by creating the styles for the date, time, and temperature
cells, linking them to the data styles with the
setStyleDataStyleNameAttribute() call:
    // cell style for Date cells
    weatherDateStyle = automaticStyles.newStyle(OdfStyleFamily.TableCell);
    weatherDateStyle.setStyleDataStyleNameAttribute("weatherDateStyle");

    // and for time cells
    weatherTimeStyle = automaticStyles.newStyle(OdfStyleFamily.TableCell);
    weatherTimeStyle.setStyleDataStyleNameAttribute("weatherTimeStyle");

    // and for the temperatures
    weatherTemperatureStyle = automaticStyles.newStyle(OdfStyleFamily.TableCell);
    weatherTemperatureStyle.setStyleDataStyleNameAttribute("weatherTemperatureStyle");
    weatherTemperatureStyle.setProperty(StyleParagraphPropertiesElement.TextAlign, "right");
}
As before, setting up the styles is the most difficult part of the program. Once they are set up, processing the input document is somewhat less involved.
Here is the code for steps 1 and 2:
void processInputDocument() {
    Scanner input;    // for reading the file
    String data;          // holds one line of the file
    String[] info;        // holds the split-up data

    TableTableCellElementBase cellElement;

    spreadsheetTable = outputDocument.getSpreadsheetTables().get(0);
    spreadsheetTable.getColumnByIndex(0).setDefaultCellStyle(weatherDateStyle);
    spreadsheetTable.getColumnByIndex(1).setDefaultCellStyle(weatherTimeStyle);
    spreadsheetTable.getColumnByIndex(2).setDefaultCellStyle(weatherTemperatureStyle);

    for (int i = 0; i < 3; i++) {
        spreadsheetTable.getColumnByIndex(i).setWidth(25); // 2.5 cm
    }
The getColumnByIndex() method retrieves a given column by its index number (with index numbers starting at zero). If the index is outside the table bounds, the table will automatically be expanded.
Here is step 3.
    // fill in the header row
    OdfTableRow row = spreadsheetTable.getRowByIndex(0);
    // row.setDefaultCellStyle(headingStyle);
    row.getCellByIndex(0).setStringValue("Date");
    row.getCellByIndex(1).setStringValue("Time");s to
    row.getCellByIndex(2).setStringValue("\u00b0C");
As with getCellByIndex(), the getRowByIndex() method expands the table to accommodate the given index.
And now, the file manipulation and loop. To save space, we
present it here without the enclosing try/catch.
    int rowNumber = 1;
    input = new Scanner(new File(inputFileName));
    while (input.hasNextLine()) {
        data = input.nextLine();
        info = data.split(",");
        /* 0 = date, 1 = time, 2 = temperatue in degrees C */
        row = spreadsheetTable.getRowByIndex(rowNumber);
        row.getCellByIndex(0).setDateValue(toCalendar(info[0], info[1]));
        row.getCellByIndex(1).setTimeValue(toCalendar(info[0], info[1]));
        row.getCellByIndex(2).setDoubleValue(Double.parseDouble(info[2]));
        row.setHeight(5, true);
        rowNumber++;
    }
    input.close();
The setDateValue() and setTimeValue() require a Calendar object as their parameter. The following method, toCalendar, takes the date and time and returns a GregorianCalendar object with the given date and time:
private GregorianCalendar toCalendar(String date, String time) {
    String[] timeParts = time.split(":");
    String[] dateParts = date.split("-");
    int[] timeInts = {Integer.parseInt(timeParts[0]), Integer.parseInt(timeParts[1]),
        Integer.parseInt(timeParts[2])};
    /* months start at zero; that's why we subtract 1 from the month */
    int[] dateInts = {Integer.parseInt(dateParts[0]), Integer.parseInt(dateParts[1]) - 1,
        Integer.parseInt(dateParts[2])};

    GregorianCalendar result = new GregorianCalendar(
        dateInts[0], dateInts[1], dateInts[2],
        timeInts[0], timeInts[1], timeInts[2]);
    return result;
}
After the file is processed, the method adds a blank row and a row with the label “Avg. Temp” and the formula for the average temperature. The formula is given in ODF1.3 format.
    row = spreadsheetTable.getRowByIndex(rowNumber + 1);
    row.getCellByIndex(1).setStringValue("Avg. Temp.");
    row.getCellByIndex(1).getOdfElement().setStyleName(headingStyle.getStyleNameAttribute());

    cellElement = row.getCellByIndex(2).getOdfElement();
    cellElement.setOfficeValueTypeAttribute(
        OfficeValueTypeAttribute.Value.FLOAT.toString());
    cellElement.setTableFormulaAttribute("of:=AVERAGE([.C2:.C" + (rowNumber) + "]");
To set the formula, we use getOdfElement() access the ODF element underlying a table cell. The setOfficeValueTypeAttribute() method sets the
office:value-type attribute to float. Finally, we set the table:formula attribute to the formula; we use rowNumber so that our code will produce the correct output for any size input data file.
After we have all our rows entered, we go back and set the heading style for the first row in the spreadsheet. (If you do this before filling in the rest of the rows, the automatic table expansion from getRowByIndex() will duplicate the first row’s styling information. This is not what you want.)
    row = spreadsheetTable.getRowByIndex(0);
    for (int i = 0; i < 3; i++) {
        row.getCellByIndex(i).getOdfElement().setStyleName(headingStyle.getStyleNameAttribute());
    }
This part of the program consists of only one line of actual code, surrounded by error handling.
void saveOutputDocument()
{
    try
    {
        outputDocument.save(outputFileName);
    }
    catch (Exception e)
    {
        System.err.println("Unable to save document.");
        System.err.println(e.getMessage());
    }
}
You may download the source and jar files needed for the project.