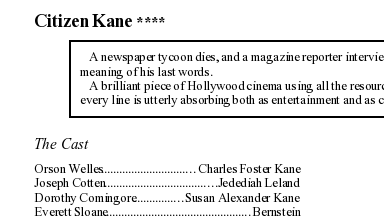
In this tutorial, you will learn to use the ODFDOM Toolkit API to take an XML file that describes movies and turn it into an OpenDocument text file. Here is a partial screenshot of what the result will look like:
The program is written to be run from the command line program; you invoke it with a command like this:
The program starts out by declaring variables that you need to accomplish the
task. First, you need a variable to hold the name of the input file, a
Document for the parsed XML, and an XPath object
to allow you to easily access the information in the document.
You will need quite a few variables for the output OpenDocument file. In order to understand these, you need to know how an OpenDocument file is structured. It’s actually a .zip format file that contains a content.xml file that holds the main content (in this case, the text), and a styles.xml file that holds some of the presentation information. (There are other files in the .zip, but they don’t concern us in this tutorial.)
The presentation information in the styles.xml file consists of the named styles such as “Heading 1,” “Default,” and the other styles names that appear in the word processor’s drop-down menu.
The content.xml file for a word processing document has
all of the content as a child of an
<office:text> element. The
content.xml file also contains some presentation information;
the automatic styles. These are styles that are automatically
created when you click the bold or italic icons in the word processor.
Here, then, are the variables needed to process the output file.
Notice the naming conventions: OdfOfficeStyles is the
class that represents the <office:styles> element.
This having been done, here is the main() method,
which creates an application and runs it via the run()
method:
This has nothing to do with ODF; it’s the standard opening and parsing of an XML file, but it’s here for the sake of completeness:
The setupOutputDocument() method starts by calling
newTextDocument() to create an ODF text
document from a template that is built into the library. Once you
have the document, the method gets the the Document Object Model (a
subclass of Document) for the content.xml and
styles.xml file.
setupOutputDocument() then retrieves the
automatic styles in content.xml and the named styles in
styles.xml (or creates them if they don’t exist yet).
It finishes by retrieving the <office:text> element
from the content DOM. All of the headings and paragraphs that make up the
document’s content will be children of this element.
The templates included in the ODFDOM toolkit have content in them; a
newly-created text document has a paragraph that contains no text. The
cleanOutDocument() method gets rid of this paragraph,
by repeatedly removing the first child of the officeText
node until there are no more.
You create a style with an OfficeStylesElement object. This
object has a name property and a displayName
property. (For details, see the
previous tutorial.)
Each style belongs to a family. The family tells
what kind of element this style is applied to. Styles for paragraphs
or headings belong to the Paragraph family; styles
for inline text belong to the Text family.
(For all the family names,
see details
)
Within the style object are the style properties.
These properties come in
property sets, and a style can have properties from more
than one set. In the output
document, the heading that reads “The Cast”
uses properties from the ParagraphProperties set to specify
its margins. It uses properties from the
TextProperties set to specify that it is italic.
(For all the property set names, see details
).
We add named styles to the styles.xml file in the
addOfficeStyles() method. It
starts off by retrieving the
default paragraph style and setting it to 10 point.
The italicized line in the preceding code does what we want, but only
for documents that have Western fonts. For documents that might
contain Asian or complex fonts (such as Hindi, Arabic, etc.)
you would also like to set the FontSizeAsian
and FontSizeComplex. Similarly, when setting
FontWeight (for bold) or FontStyle (for
italic), you will probably also want to set the
FontWeightAsian, FontWeightComplex
FontStyleAsian, and FontStyleComplex properties
as well.
Since setting font weight and style and size are frequent occurrences, and since you really do want your documents to be international-friendly, the italicized line is replaced with this code:
This is a call to one of the following three utility routines to make your life easier:
The addOfficeStyles() method adds several different styles
to the styles.xml DOM. There are separate styles for a
movie heading, cast heading, synopsis paragraph, and an entry (paragraph)
in the cast member list. This last style will also need to have specify
a tab stop with dots as a leader to separate the actor’s real name
from the name of the character she portrays.
Finally, the method creates an inline style for
the rating stars; they need to be slightly smaller than the movie title
font size.
I won’t present all of the method here lest your eyes glaze over. Instead, here is the code for setting up the style for paragraphs in the synopsis; the other styles use similar code.
The sequence you should follow is:
When you create the style using newStyle(), it is
automatically added to the list of styles.
Note that the code that follows
does not set the top and bottom margins, so they default to zero.
The other style that is different from the others is the cast paragraph with its tab stop. The hierarchy of elements in the resulting XML is:
<style:style>
<style:paragraph-properties>
<style:tab-stops>
<style:tab-stop>In this instance, you must explicitly create the
OdfStyleParagraphProperties object. You didn’t have to
do this when using style.setProperty(...), because that method
automatically creates the
<style:paragraph-properties> element for you.
Setting up all your styles is the most tedious part of the process of creating an OpenDocument file; adding content is relatively less troublesome.
Processing the input consists of grabbing all the
<movie> elements, extracting the relevant sub-elements
and adding the appropriate ODFDOM objects to the output document. The
following method has a try/catch block to catch
exceptions thrown by the subsidiary methods.
The processTitle() method adds the movie’s title and
star rating; the stars are in a OdfSpan object, since their
style requires a smaller font size. Instead of using
getElementsByTagName(), this method uses XPath to extract
the information.
The general sequence for adding content to the output document is to
create the appropriate ODF object and use
addStyledContent() to add the content (the second parameter
to the method) with the style specified as the first parameter.
Th
Similar code adds the synopsis for each movie; the method needs a loop
to handle all the <para> elements in the
<synopsis> element. The paragraphs are retrieved
with an XPath expression that returns a NodeSet.
Rather than create a separate
variable for the <para>’s text content,
processSynopsis() sets the style on the paragraph when
it creates it. The method also extracts the
text all at once with the expression
shown in the italicized code.
And this is more of the same. After adding a heading
for the cast, an XPath expression retrieves all the
<actor> nodes. Then a for loop processes
each one, again using XPath to get the actor’s name and role.
If the actor’s role is mentioned, then processCast()
must add a tab to separate the name and role.
You can’t do this by putting a \t character into the output; ODF treats tabs and
newlines as if they were just a blank (it “normalizes” them).
The addContentWhitespace() method, used in the
following code, will output a <text:tab>
or <text:line-break> element when
it encounters a tab or newline in the content.
This is only one line of actual code, surrounded by error handling.
You may download the files for this program.